如何在Volantis-5主题上使用artalk评论系统(同本站)
artalk以私有化部署实现数据自控与极速响应,社交登录、邮件通知、Markdown 等功能开箱即用。话不多说,下面直接上教程。
这里我犯了很多错一直走回头路,一个配置反复折腾,以下是最简步骤。
1 在服务端配置 Nginx
1.1 准备工作
我这里是采用了腾讯云的轻量应用云服务器,使用的Ubuntu并安装好了docker。这里采用docker部署。
1.2 解析域名到服务器
这一步主要是为了开启HTTPS,如果是动态ip,还可以配合DDNS动态解析域名。
推荐使用artalk.example.com这样的子域名格式,域名可以和博客网站保持一致,简化备案流程。
在本地电脑打开终端,运行:
bash
如果返回的ip是解析的ip,说明解析成功。
1.3 安装 Nginx
登录你的服务器,执行:
Bash1
2
3
4
5
6
7
8
9
| # 更新包列表
sudo apt update
# 安装 Nginx
sudo apt install nginx -y
# 启动并设置开机自启
sudo systemctl start nginx
sudo systemctl enable nginx
|
测试 Nginx 是否正常:
浏览器访问:artalk.example.com,看到Nginx欢迎页则说明安装成功。
1.4 创建 Nginx 配置文件(不启用 HPPTS)
- 创建文件
bash1
| sudo nano /etc/nginx/sites-available/artalk.xinghenluyus.cn.conf
|
nginx1
2
3
4
5
6
7
8
9
10
11
12
13
14
15
16
17
18
19
20
21
22
23
24
25
26
| server {
listen 80;
server_name artalk.xinghenluyus.cn;
# Certbot 验证路径
location /.well-known/acme-challenge/ {
root /var/www/certbot;
try_files $uri =404;
}
# 其他请求先不重定向(或可重定向,但不能 listen 443)
location / {
# 可选:先不重定向,等证书申请完再开启
proxy_pass http://127.0.0.1:8080;
proxy_set_header Host $host;
proxy_set_header X-Real-IP $remote_addr;
proxy_set_header X-Forwarded-For $proxy_add_x_forwarded_for;
proxy_set_header X-Forwarded-Proto $scheme;
proxy_set_header X-Forwarded-Port $server_port;
proxy_set_header X-Forwarded-Host $host;
proxy_http_version 1.1;
proxy_set_header Upgrade $http_upgrade;
proxy_set_header Connection "upgrade";
}
}
|
- 测试配置
bash1
2
| // 省略软链接到available
sudo nginx -t
|
- 应该输出
1
2
| nginx: the configuration file /etc/nginx/nginx.conf syntax is ok
nginx: configuration file /etc/nginx/nginx.conf test is successful
|
- 重载Nginx
bash1
| sudo systemctl reload nginx
|
1.5 申请 Let’s Encrypt 证书(Certbot 会自动配置 HTTPS)
- 安装 Certbot
bash1
| sudo apt install certbot python3-certbot-nginx -y
|
- 创建验证目录
bash1
| sudo mkdir -p /var/www/certbot
|
- 创建验证目录
bash1
| sudo certbot --nginx -d artalk.xinghenluyus.cn
|
按提示操作:
- 输入邮箱(用于安全通知)
- 同意服务条款(输入 Y)
- 是否接收推广邮件?输入 N
- 是否将 HTTP 重定向到 HTTPS?选择 2(强制重定向)
2 服务器安装 Artalk
2.1 程序部署
执行命令在后台启动容器:
请注意ATK_SITE_DEFAULT改成你的网站title(对应_config.yml文件中title),ATK_SITE_URL改成服务器实际解析域名。
bash1
2
3
4
5
6
7
8
9
| docker run -d \
--name artalk \
-p 8080:23366 \
-v $(pwd)/data:/data \
-e "TZ=Asia/Shanghai" \
-e "ATK_LOCALE=zh-CN" \
-e "ATK_SITE_DEFAULT=Artalk 的博客" \
-e "ATK_SITE_URL=https://artalk.example.com" \
artalk/artalk-go
|
执行命令创建管理员账户:
bash1
| docker exec -it artalk artalk admin
|
2.2 进入后台
主机浏览器输入 https://artalk.example.com 进入 Artalk 后台登录界面。
如果这这一步不成功,自行在 1.4, 1.5, 2.1 之间排查原因。
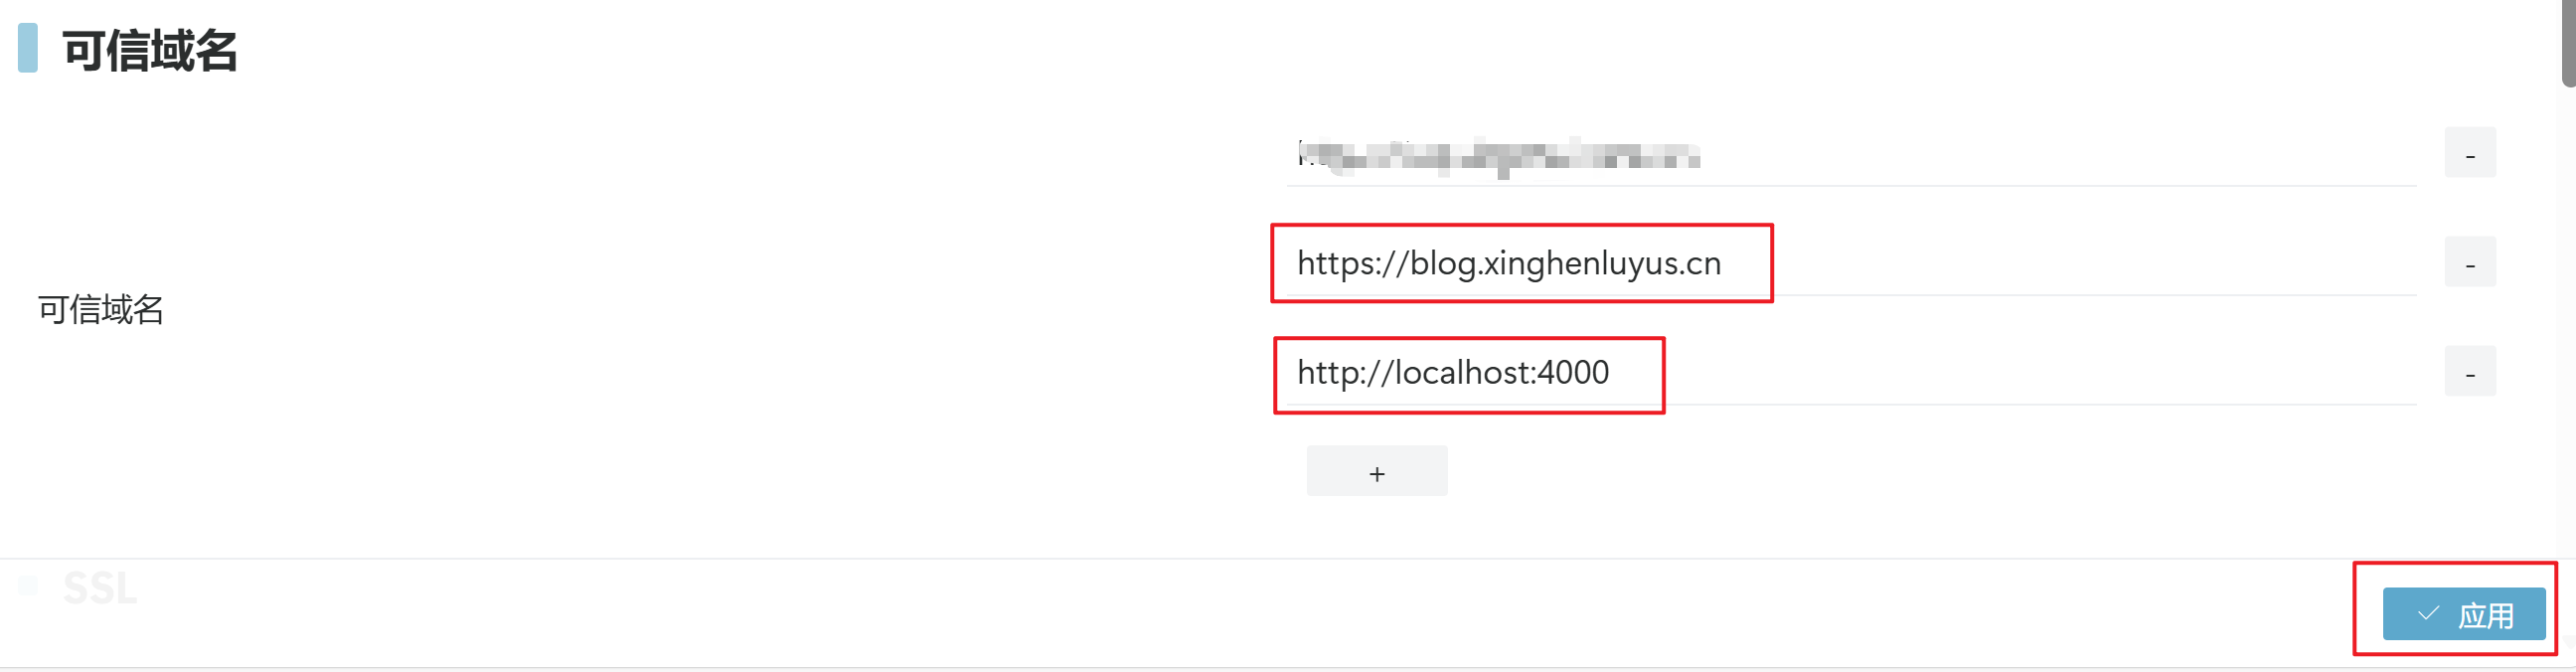
2.3 配置可信域名
登录后台 -> 设置 -> 可信域名
将你的博客域名 (也就是要使用这个评论系统页面的所有域名) 都添加到可信域名列表中,解决CORS报错。然后点击右下角应用。
3 Volantis 配置 Artalk
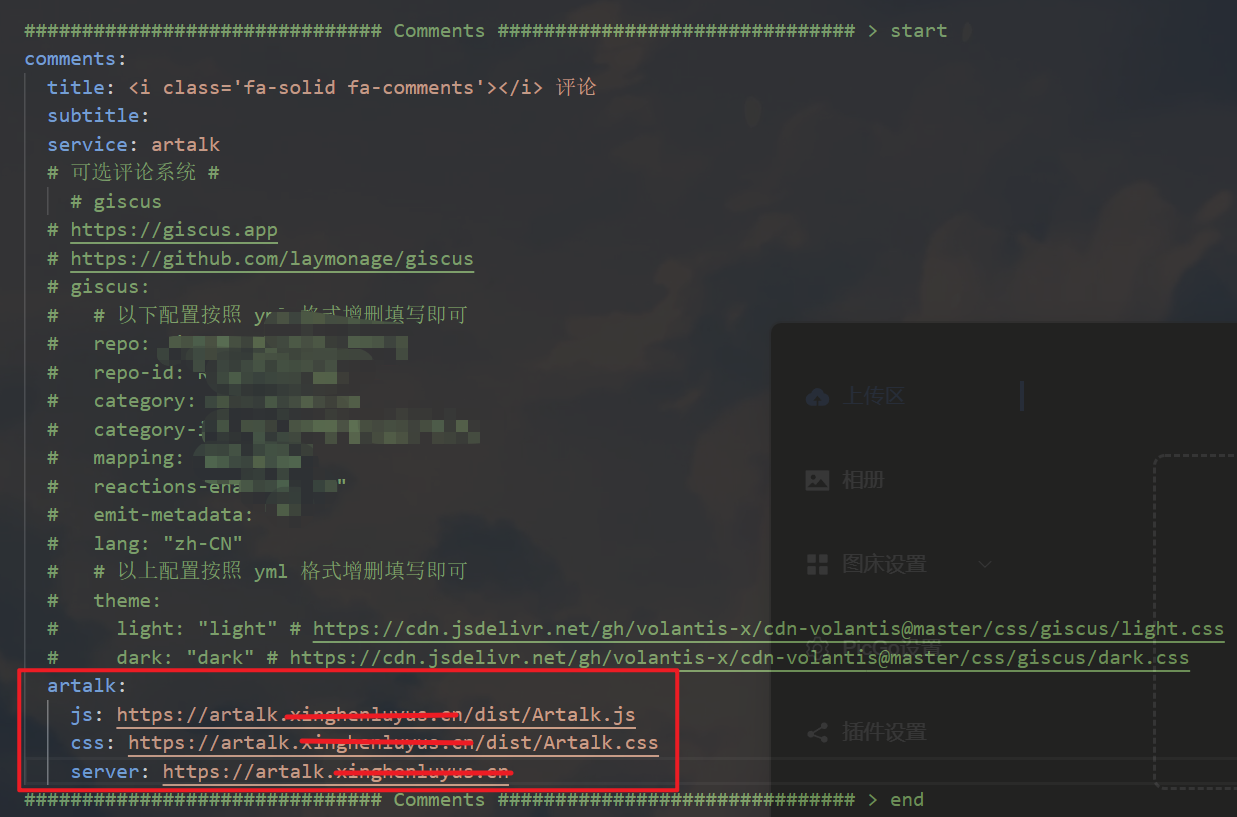
打开_config.volantis.yml文件,添加artalk相关配置
如果你的Volantis版本是5.8.0,则对于新版Artalk也就是2.9.1,浏览器会弹出pjax错误。
这时有两个解决方案:
- 如果你是通过npm安装的,可以打开
node_modules\hexo-theme-volantis\layout\_plugins\comments\artalk\script.ejs,用下面代码替换源码。(记得做好备份工作)
script.ejs1
2
3
4
5
6
7
8
9
10
11
12
13
14
15
16
17
18
19
20
21
22
23
24
25
26
27
28
29
30
31
32
33
34
35
36
37
38
39
40
41
42
43
44
45
46
47
48
49
50
51
52
53
54
55
56
57
58
59
60
61
62
63
64
65
66
67
68
69
70
71
72
73
74
75
76
77
78
79
80
81
82
83
84
85
86
87
88
89
90
91
92
93
94
95
96
| <script>
volantis.layoutHelper("comments", `<div id="artalk_container"><i class="fa-solid fa-cog fa-spin fa-fw fa-2x"></i></div>`);
function load_artalk() {
if (!document.querySelector("#artalk_container")) return;
volantis.css("<%- theme.comments.artalk.css %>");
volantis.js("<%- theme.comments.artalk.js %>")
.then(() => {
if (typeof Artalk === 'undefined') {
console.error('Artalk.js loaded but Artalk is not defined');
return;
}
return pjax_artalk();
})
.catch(err => {
console.error('Failed to load Artalk.js:', err);
});
}
function pjax_artalk() {
if (!document.querySelector("#artalk_container")) return;
let path = pdata.commentPath;
let placeholder = pdata.commentPlaceholder || "<%= theme.comments.artalk.placeholder %>" || "";
if (!path) {
path = '<%= theme.comments.artalk.path %>' || decodeURI(window.location.pathname);
}
if (!'<%= config.permalink %>'.includes('/index.html')) {
path = path.replace(/\/index\.html$/, '/').replace(/\.html$/, '');
}
volantis.artalk = Artalk.init(Object.assign(<%- JSON.stringify(theme.comments.artalk) %>, {
el: '#artalk_container',
pageKey: path,
pageTitle: document.title,
placeholder: placeholder,
useBackendConf: true,
site: '<%= config.title %>',
darkMode: volantis.dark.mode === "dark",
pvEl: '#artalk_visitors',
<% if(!!theme.comments.artalk.imageUploader?.api){ %>
imgUploader: function(file) {
let headers = new Headers();
headers.set('Accept', 'application/json');
<% if(!!theme.comments.artalk.imageUploader?.token) { %>
headers.set('Authorization', '<%= theme.comments.artalk.imageUploader?.token %>');
<% } %>
let formData = new FormData();
formData.append('file', file);
return fetch('<%= theme.comments.artalk.imageUploader?.api %>', {
method: 'POST',
body: formData,
headers: headers
})
.then(resp => resp.json())
.then(resp => resp.<%= theme.comments.artalk.imageUploader?.resp %>);
},
<% } %>
}));
Artalk.use(ctx => {
ctx.on('list-loaded', () => {
if (typeof VolantisFancyBox === "undefined") {
const checkFancyBox = setInterval(() => {
if (typeof VolantisFancyBox === "undefined") return;
clearInterval(checkFancyBox);
VolantisFancyBox.groupBind('.atk-content img:not([atk-emoticon])', 'Comments');
}, 100);
} else {
VolantisFancyBox.groupBind('.atk-content img:not([atk-emoticon])', 'Comments');
}
});
});
}
load_artalk();
volantis.pjax.push(() => {
if (typeof Artalk === "undefined") {
load_artalk();
} else {
pjax_artalk();
}
}, 'artalk');
function dark_artalk() {
if (!document.querySelector("#artalk_container")) return;
if (volantis.artalk && typeof volantis.artalk.setDarkMode === 'function') {
volantis.artalk.setDarkMode(volantis.dark.mode === "dark");
}
}
volantis.dark.push(dark_artalk);
</script>
|
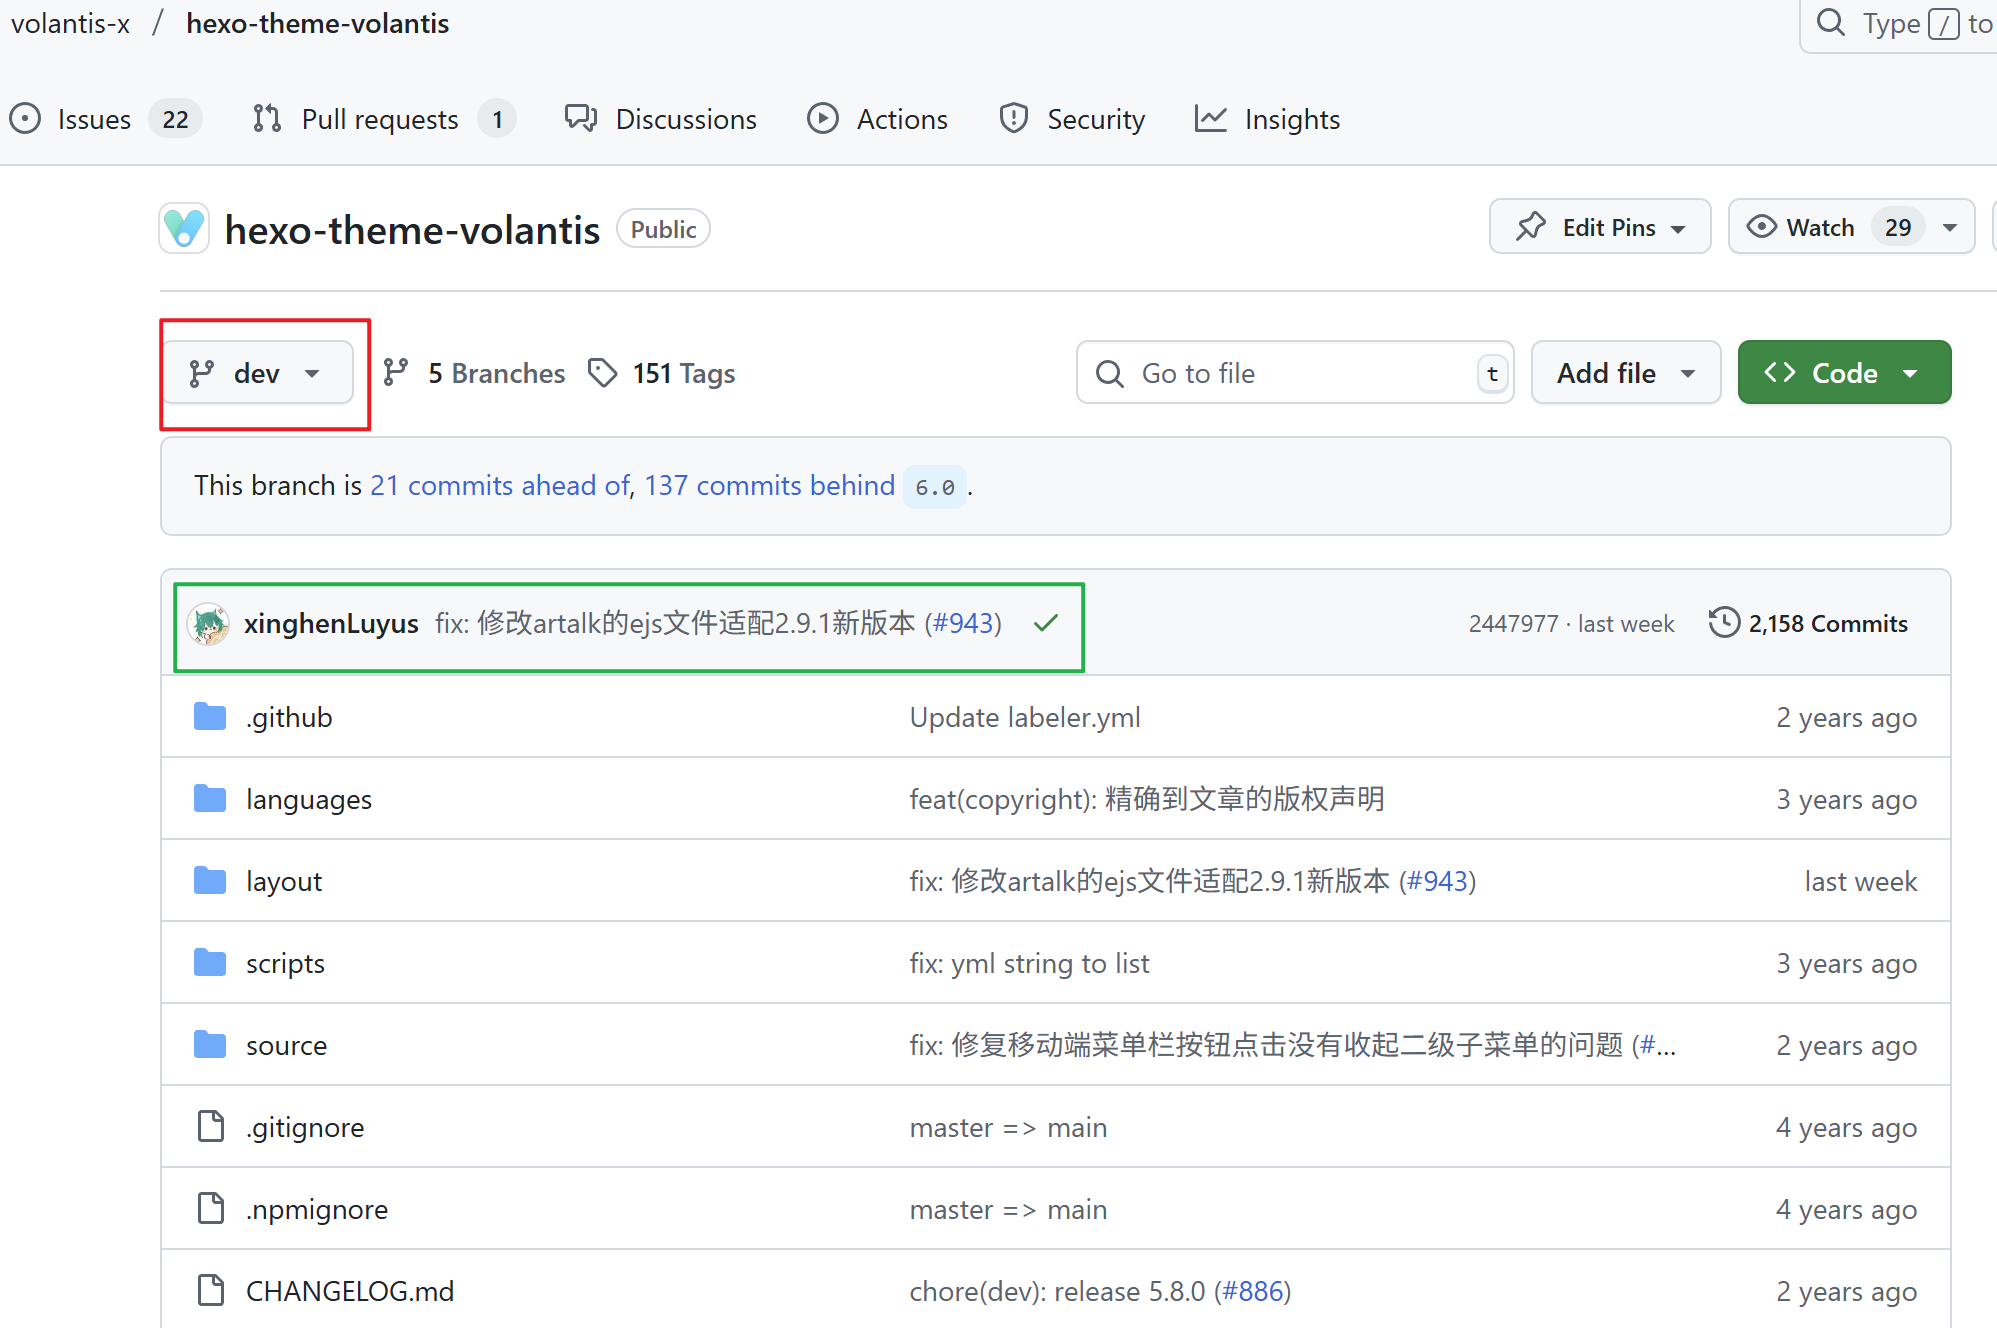
- 如果你是通过拉取仓库源码方式安装,可以拉取仓库最新的
dev分支,我的代码已经被合并到dev分支,暂时还没作为5.8.1版本发布。
到这里你的blog已经成功集成Artalk啦!